Showing posts with label Tutorial. Show all posts

Sunday, 24 June 2012

Applying Foundation Series - Episode 2 - Sponge

Hi Pretties

I finally have gotten around to doing episode 2 of my applying foundation series.  This time I have used a sponge.

You can check out the video below!


Monday, 4 June 2012

Tutorial - Rimmel Glam Eyes Smokey Noir Quad

Hi Pretties

Today I'm going to do a photo tutorial for you all.  This is using the Rimmel Glam Eyes Smokey Noir Quad.
I'm hoping to do more one quad tutorials for you guys so let me know if you like them!

Step One - Prime Your Eyes

Step Two - Take the highlight colour on your brush of choice and apply all over your eyelid and up to the brow bone and into the inner corner


Step Three - Take the second lightest colour and apply from about half way over the outer half of the lid

Step Four - Take the second darkest corner and just place into the crease in a windscreen wiper motion on a fluffy crease brush


Step Five - Take the darkest colour on a smaller flat brush and line under your eyes about half was across

Step Six - Create a light upwards like a wing with the shadow


Step Seven - Take the same brush and pull that line inwards to soften it up.  Darken up the outer lid with the colour as well without taking any more on your brush

Step Eight - Use a blending brush to get rid of the harsh lines


Step Nine - Fill in your brows


Step Ten - Line your upper lash line

Step Eleven - Curl your lashes

Step Twelve - Apply mascara


Step Thirteen - Apply a white or nude eyeliner onto your water line.  If you use white, just do a light line so it does not look to stark


Voila!  The finished look :)

I hope you enjoyed this tutorial.

Friday, 4 May 2012

FOTD - Casual day


Happy Friday lovelies

Today I though I would do a face of the day/tutorial using my new UD Naked Palette.  Yup, I'm really slow to jump on the Naked Palette bandwagon, but I'm so glad I finally did.  I LOVE my Naked Palette.


How to:


1. Apply foundation - I use Loreal Matte Morphose in 115

2. Dust powder to set.  I use Mac Mineralise Skinfinish Natural

3. Apply blush - I used Mac Melba applied with my Manicare Artiste no17 Stippling brush

4. Fill in eyebrows - I used Rimmel Eyebrown Pencil in dark brown.  I got my eyebrows tinted yesterday so this is a new colour for me.
5. Prime eyes - I used UD Primer Potion

6. Apply shadow to CREASE - I used Darkhorse which is the 8th colour from the left (I took the same colour as a bottom lash eyeliner.)

7. Apply shadow to LID - I used Half Baked with is the 6th colour from the left

8. Blend out colours

9. Apply highlight - I used Virgin which is the 1st colour

10. Apply eyeliner - Today I used Maybelline Master Precise on the top lash line

11. Line waterline - I used ChiChi eyeliner in Virgin

12. Mascara! - Loreal Extra Volume Collagene

13. Lipstick - Today I wore Rimmel Pink Blush


Eyes Closed
That's my face of the day :)


Monday, 23 April 2012

Tutorial - Using the Australis Nudist Palette


Hi Pretties

I have just done a review on the Australis Nudist palette so I thought I would do a quick tutorial to show you one look you can do using this palette!


Here is the finished look!  (Excuse the headband I forgot to take if off before I took my photo).  For the rest of the look I just kept my make up simple with only foundation, powder, blush and a pale lipstick.

1. Prime your eyes - I used Mac Paint Pot in Bare Study.

2. Apply a highlight to the inner corner and brow bone - I used the first colour in the palette which is Intensifeye Trio Bees Knees Shade One.

3. Apply the 5th colour (Intensifeye Quad Choc-a-Block Shade Two) to the lid and up into the crease.

4. Apply the 7th shade into the crease and outer v, up towards the brow bone.  This colour is Paparazzi Perfect Snap Attack.  Do a thin half line of this colour under your bottom lashes as well.

5. Blend!

6. Apply eyeliner - I used Maybelline Master Precision.

7. Apply mascara - I used Covergirl Lash Perfection.

Viola!

Your finished look.


Don't forget to enter my Giveaway here.


Friday, 20 April 2012

Tutorial - Sea inspired eyes


Hi Pretties

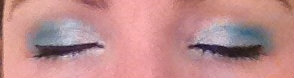
I know I had an eye post earlier today.  But I wanted to show you a quick tutorial on how I did my eyes for a family dinner tonight!  Tonight I had sea inspired eyes :)

The whole look is to the left.  I kept the rest of my face very minimal with only a dusting of blush (Models Prefer Desk to Date) and a lip gloss (Essence My Favourite Milk Shake).


 Products used


Step 1 - Prime your eyes.  I've used Mac Paint Pot in Bare Study

Step 2 - Apply a frosted or shimmer white on the inner half of your lid into the tear duct, and take below the eye again only half way across.  I've used the white from my DB Got the Blues for Mauve palette.  This is amazingly pigmented for how cheap it is.

Step 3 - Take a blue/green colour and apply to the outer part of your lids, and under the eye as a liner across the outer half of the eye.  I used a colour from my 88 shimmer palette.  You can get these from ebay or Coastal Scents.

Step 4 - Take the same colour and apply to the outer crease and v.  I like to keep the look simple as I think it is more effective with just the two colours and no darker colours.

Step 5 - Apply a highlight - I like Mac Blanc Type as it matte where the rest of my eye is a frost and shimmer.

Step 6 - Apply eyeliner to your entire water line.  I used Rimmel Exaggerate eye definer.

Step 7 - Line your lid.  I used Maybelline Master Precise liquid liner.

Step 8 - Curl your lashes and apply mascara.  I used Loreal Extra Volume Collagene mascara.


Here is the finished product!


That's my look for this evening!

Let me know if you would like to see more tutorials!